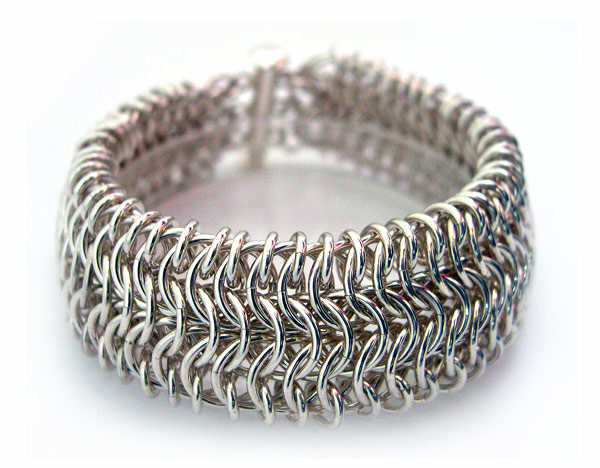
Anyone who has ever tried to photograph their chainmaille jewelry can tell you it’s not easy. Whether you’re trying to take a picture to share with folks on facebook, post on etsy, or submit to a publisher, you want your photos to do your hard work justice and blurry, too dark, or too glare-y photos are not going to do that. Great jewelry photos are not out of reach…it just takes a little know-how. Here are some of my DOs & DON’Ts for getting a great shot of your jewelry.
DO find a camera with a macro setting (often indicated by a picture of a tulip) and use it for shots that are close up or for smaller pieces.
DO use a tripod and a cable release or remote shutter release. Even the slightest movement can throw your images out of focus so these are a must! If your camera doesn’t have one of these options, you can try using the timer mode.

DO experiment with the focus modes of your camera. Most cameras have a center-weighted focus mode which means that whatever is in the center of your lens will be the thing the camera focuses on. (This means you can control what thing that is!)
DO make sure you have ample light when shooting. When there isn’t enough light, your camera tries to make up for it by either lengthening the exposure time (which allows for more time for accidental movement from say….breathing!…to occur) or by opening the lens aperture up more which causes a the focal plane to be really shallow (meaning part of your work will be in focus but probably not the whole thing unless it is completely parallel to your lens.) At B3 we have some relatively inexpensive studio hot-lights which used high watt bulbs to produce lots of light.
 DON’T use on-camera flash to make up for not having enough ambient light. Particularly because chainmaille is so shiny, on-camera flashes are more of a problem-causer than anything in my experience and lead to crazy glare, washed out color, weird shadows and a number of other unpleasant things.
DON’T forget to pay attention to the background. Backgrounds don’t have to be fancy (afterall, you want the focus to be on your jewelry) but they do need to be clean and thoughtful.
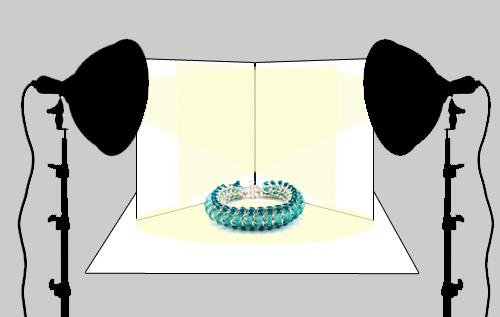
DO experiment with “bouncing” light. Use bright white paper opposite of your light source to fill in shadowy areas and create more even lighting. Here is an example of the simple photo setup we use most often. I usually just fold a piece of heavy, bright-white printer paper and stand it up behind the piece to help bounce light.

DO get to know your white balance feature. Every light source has a different light temperature which your camera sees as different color casts. Daylight is blue, tungsten lights are yellow-orange, fluorescent lights are green, etc. The white balance feature allows you to correct for these color casts in camera saving you from having to do lots of post-production to correct for weirdly colored images. Most white-balance modes will have choices like daylight, tungsten, etc. and many also have a custom setting that allows you to put a white piece of paper in front of the lens in your shooting situation and create your own perfect balance with a shutter snap.
Finally…DON’T be afraid of manual mode. In manual mode, you are considering two camera functions – aperture (the hole the light enters through into your camera – like your camera’s pupil) and shutter speed (how long your camera lets light in for – like your eye lid.) Just remember, a smaller number for the aperture or f-stop means a wider opening and just like your pupil dilates in a dark room, your camera needs a larger aperture to let more light in. Dial down that number and let more light in for darker situations. For shutter speed, remember that a longer exposure (represented by a smaller number because it is measured in fractions of a second until you get to full second exposures) means more light will come in but also opens you up for more camera movement and blur. These two elements work together reciprocally meaning, if I widen my aperture one stop, I need to shorten my shutter speed one stop to keep the same exposure and vise versa. One more note, the aperture also affects depth of field (mentioned earlier). A smaller aperture will create a longer depth of field and make your whole piece look crystal clear but you’ll need a longer shutter speed to make up for it. I know it can be intimidating but with only a little knowledge and some experimenting, you can start to better understand how your camera is using light and avoid shots that are too dark or too light.
This may seem like an awful lot of things to consider when taking a picture but the better you get at controlling all these variables, the better your photos will be in-camera. Most people are not going to purchase and learn how to use a program like Photoshop to do a lot of retouching and post-production so its better to invest the time upfront to make your shot look it’s best right in the camera.


DSLR’s are expensive! The good news is that point and shoot cameras are getting better and better. The Canon PowerShot S95 has a bunch of features you would expect on a DSLR including several shooting modes (including manual), multiple focus modes (including manual and spot focus) as well as a macro mode. It’s definitely higher end but still about half the price of a basic DSLR.